Network configuration
In order, to benefit from all the advantages of blocky like ad-blocking, privacy and speed, it is necessary to use blocky as DNS server for your devices. You can configure DNS server on each device manually or use DHCP in your network router and push the right settings to your device. With this approach, you will configure blocky only once in your router and each device in your network will automatically use blocky as DNS server.
Transparent configuration with DHCP
Let us assume, blocky is installed on a Raspberry PI with fix IP address 192.168.178.2. Each device which connects to
the router will obtain an IP address and receive the network configuration. The IP address of the Raspberry PI should be
pushed to the device as DNS server.
┌──────────────┐         ┌─────────────────┐
│              │         │ Raspberry PI    │
│  Router      │         │   blocky        │
│              │         │ 192.168.178.2   │
└─▲─────┬──────┘         └────▲────────────┘
  │1    │                     │  3
  │     │                     │
  │     │                     │
  │     │                     │
  │     │                     │
  │     │                     │
  │     │                     │
  │     │       ┌─────────────┴──────┐
  │     │   2   │                    │
  │     └───────►  Network device    │
  │             │    Android         │
  └─────────────┤                    │
                └────────────────────┘
1 - Network device asks the DHCP server (on Router) for the network configuration
2 - Router assigns a free IP address to the device and says "Use 192.168.178.2" as DNS server
3 - Clients makes DNS queries and is happy to use blocky
Warning
It is necessary to assign the server which runs blocky (e.g. Raspberry PI) a fix IP address.
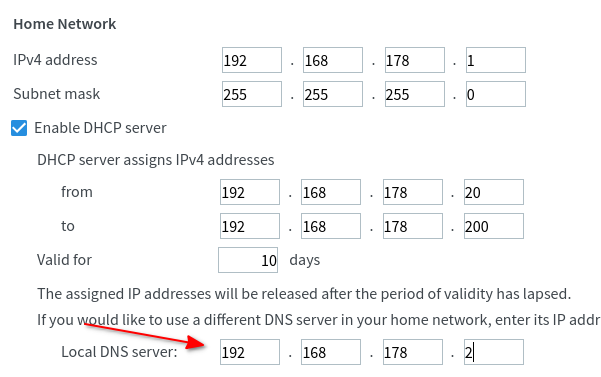
Example configuration with FritzBox
To configure the DNS server in the FritzBox, please open in the FritzBox web interface:
- in navigation menu on the left side: Home Network -> Network
- Network Settings tab on the top
- "IPv4 Configuration" Button at the bottom op the page
- Enter the IP address of blocky under "Local DNS server", see screenshot
